The short answer on how to overlap corrugated metal roofing: lap the sides one full corrugation (two on low slopes), lap panel ends 6 to 12 inches, and run every lap away from the prevailing wind. Get those three numbers right and the roof sheds water for decades. Get one wrong and you buy a leak that only shows up during a storm, which is the hardest kind to find.
How Much Should Corrugated Metal Roofing Overlap?
Two numbers cover almost every residential corrugated job:
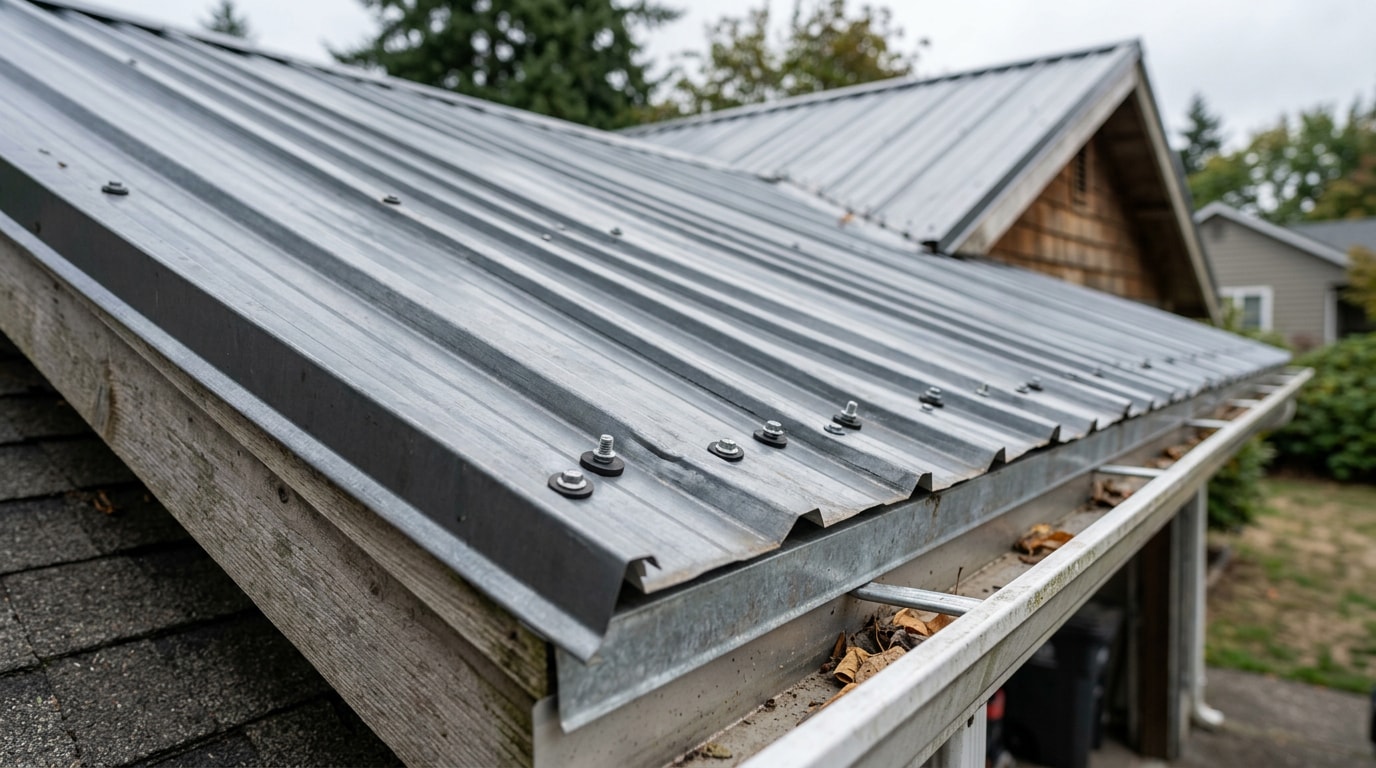
- Side lap (panel to panel across the slope): one full corrugation on standard profiles, roughly 2.5 to 4 inches depending on wave spacing. Two corrugations below 3:12, on coastal sites, and in steady-wind exposures.
- End lap (panel to panel down the slope): 6 inches on steep roofs, 8 to 12 inches as pitch flattens.
Manufacturer instructions beat every general figure here. Metal Sales, for example, specifies a 6 inch endlap with the ridge panel installed over the eave panel and tape sealant, fastened through both panels , and requires that tape sealant be applied across the full width of the upper end of the eave panel . You can read the full sequence in the Metal Sales Classic Rib installation guide and compare it against the spec sheet for your own profile.
One detail that quietly breaks laps at the corners: where endlaps and sidelaps meet, both ridge panels must overlap both eave panels . If you let a lower panel ride on top at that intersection, you have built a dam at the exact point where four sheets meet.
Overlap Specs by Roof Pitch
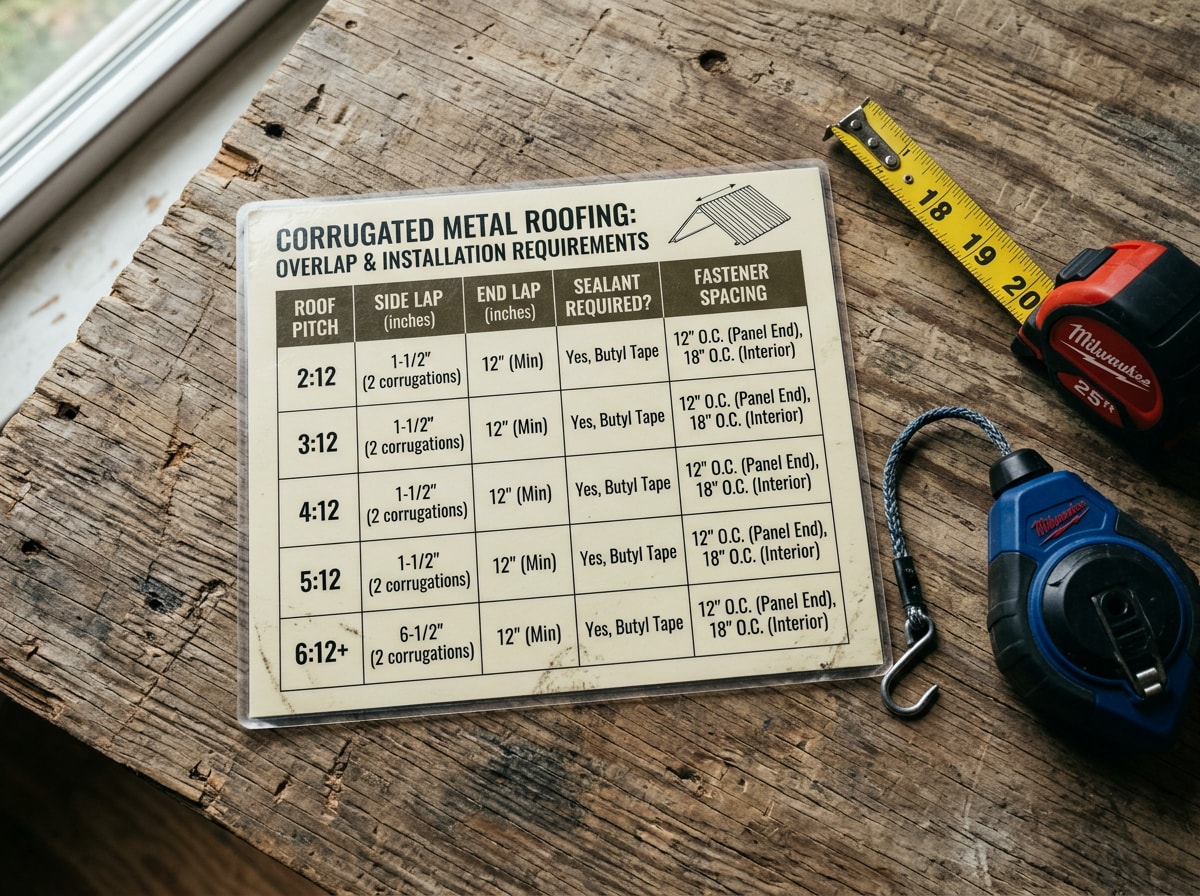
Roof pitch drives every lap number on the roof. Steep slopes move water off fast. Shallow slopes hold water on the panel longer, which gives capillary action time to wick moisture backward under a seam. As pitch drops, laps grow and sealant stops being optional.
| Roof pitch | Side lap | End lap | Sealant | Fastener spacing at laps |
|---|---|---|---|---|
| Above 6:12 | 1 corrugation | 6 in. | Recommended | 12 to 18 in. |
| 3:12 to 6:12 | 1 to 2 corrugations | 8 to 10 in. | Required | 12 in. |
| Below 3:12 | 2 corrugations | 10 to 12 in. | Required, double bead | 8 to 12 in. |
There is a hard code floor under all of this. Section R905.10.2 of the IRC sets 3:12 as the minimum slope for lapped, nonsoldered-seam metal roofs without applied lap sealant, 1/2:12 when lap sealant is applied per the manufacturer's instructions, and 1/4:12 for standing-seam systems. You can read the section in the published IRC Chapter 9 roof assemblies text.
Two practical notes on that floor:
- Check which code edition your jurisdiction has adopted for 2026. Your building official can enforce something stricter.
- Below the floor, a low-slope roof needs a different assembly, not a bigger overlap. More lap will not rescue a 1:12 corrugated roof.
Which Way Do You Overlap Corrugated Roofing Sheets?
Start at the eave and work upslope, beginning on the side of the roof opposite the prevailing wind. Every upper panel covers the one below it, and every side lap faces downwind.
That direction rule exists for one reason: wind-driven rain does not fall straight down. It travels sideways across the panel surface and hunts for an open edge. A side lap facing into the wind hands it a funnel. A lap facing downwind presents a closed edge and a continuous shingle-style path to the gutter.
To find your direction, check a wind rose from the nearest weather station rather than guessing. Prevailing wind varies by region, and tree lines, slope, and neighboring buildings shift it on a single lot. There is no universal "always start on the left" rule.
Side Lap vs. End Lap: What Changes
A side lap joins two panels edge to edge across the slope. An end lap splices one panel to another end to end down the slope. They fail differently, so they get sealed differently.
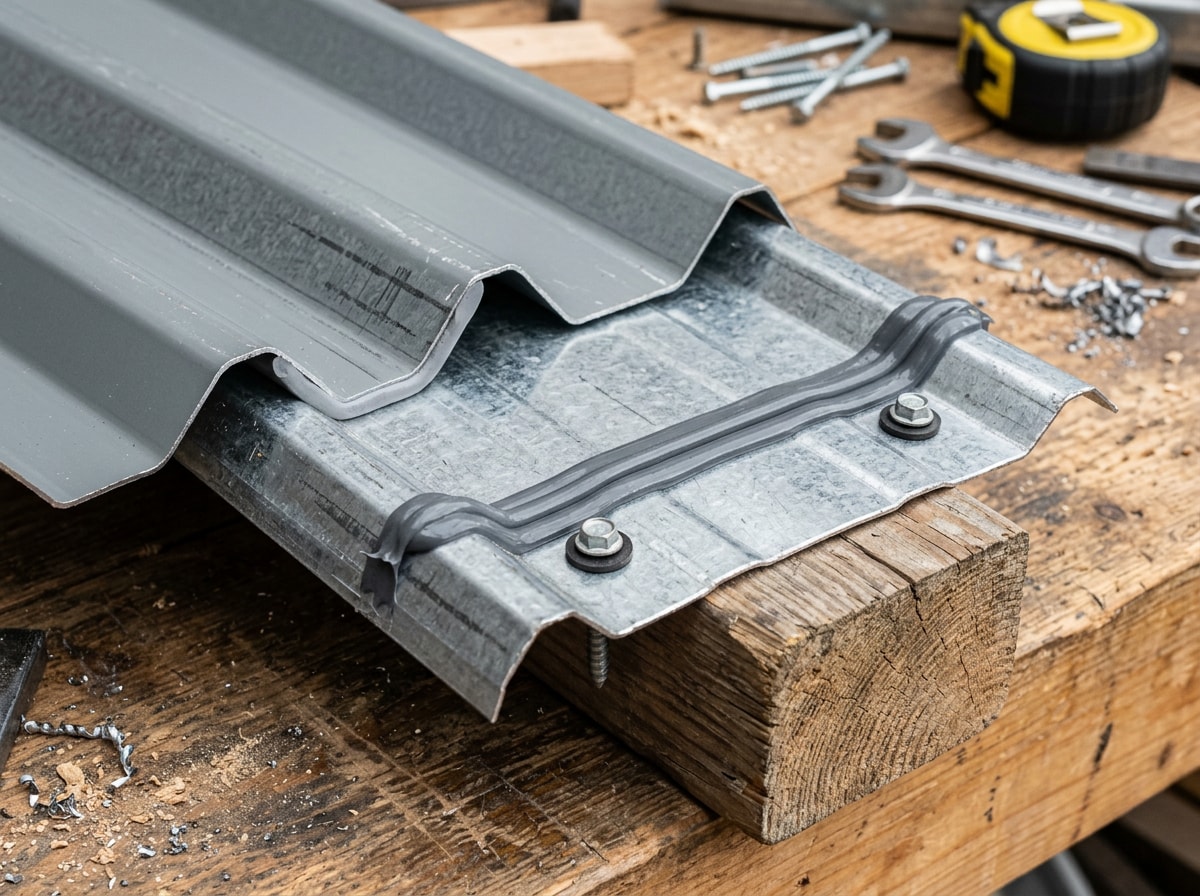
Side lap. Run butyl tape continuously along the designated lap rib before you set the next panel. Press it down over the full length. A seal with gaps is not a seal. Then fasten through both sheets so the screws compress the tape into a solid line.
End lap. Sealant runs across the entire width of the lap, not just at the ribs, because water migrates laterally under a horizontal splice. Fasteners pass through both panels into structure and compress the sealant into a continuous bead without crushing it flat.
Two structural rules make or break end laps:
- Every splice lands over a rafter, batten, or purlin. Never mid-span, where foot traffic and snow load flex the seam open.
- Stagger end laps across the roof instead of lining them up in one row. A continuous horizontal joint line is a shared failure point and a wind-uplift target.
The Coverage Math Nobody Runs Before Ordering
This is where low-slope jobs go over budget, and almost no overlap guide spells it out.
Corrugated panels are sold by nominal width but installed by net coverage. A common 7/8 inch by 2.5 inch corrugated sheet is 26 inches wide and covers about 24 inches once one corrugation is lapped. Go to two corrugations for a low slope or a windy site and you give up another 2.5 inches of coverage per sheet.
Here is what that does to a single 40-foot-wide course (480 inches):
| Side lap | Net coverage per sheet | Sheets per 40 ft course | Extra sheets vs. 1 corrugation |
|---|---|---|---|
| 1 corrugation | ~24 in. | 20 | n/a |
| 2 corrugations | ~21.5 in. | 23 | 3 |
That is roughly 15 percent more panels for the same roof, before trim and waste. On a full house with multiple courses, the two-corrugation decision can add a meaningful line to the material order.
The fix is simple: decide your side lap before you order, calculate on net coverage, and add waste on top of that. We have watched more than one DIY order come up two sheets short on the final course for exactly this reason, and partial-width filler strips at a rake edge are an ugly, leak-prone patch. If you are still sourcing material, our guide to where to buy metal roofing near you covers which supplier types will quote net coverage without being asked.
How to Overlap Corrugated Iron Sheets: Step by Step
The sequence matters as much as the measurements. Nothing downstream fixes an out-of-square first sheet, so slow down at the start.
Step 1: Prep the Deck and Underlayment
Plywood or OSB should be clean, flat, dry, and free of raised fasteners.
Run underlayment horizontally from the eave upward, with each course lapped over the one below. Typical laps are 4 inches at horizontal seams and 6 inches at ends, more on low slopes.
That underlayment lap is your backup drainage plane. Treat it as a second roof, not a formality.
Step 2: Pick the Starting Corner
Your starting corner sits at the lower edge of the roof, on the side opposite the prevailing wind.
Mark it. Chalk the first panel line before anything gets carried up the ladder.
Step 3: Set the First Panel Square and True
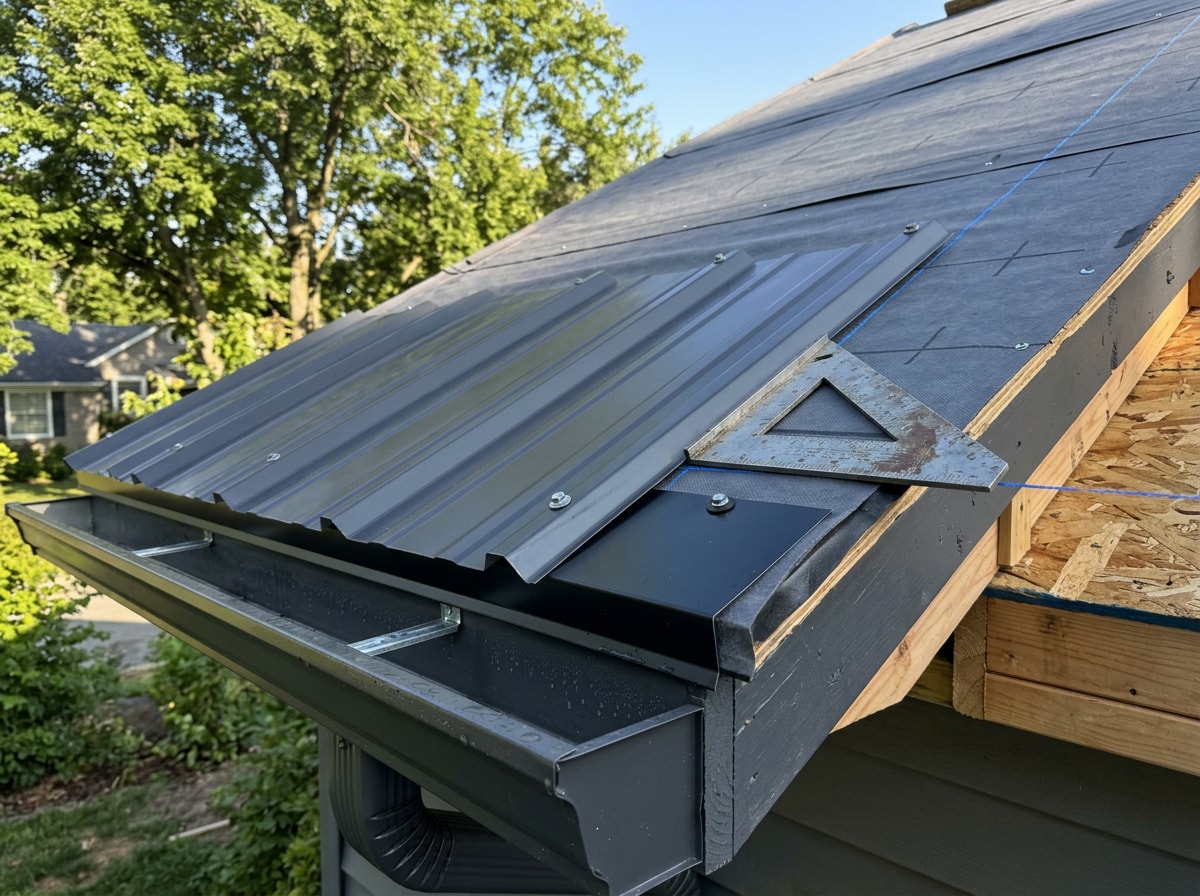
Overhang the drip edge by about 1 to 2 inches so runoff drops into the gutter instead of curling back onto the fascia. Check gutter position before you commit.
Square it with a roofing square at the eave, then snap a chalk line up the slope as a reference for the whole run.
A panel that is out of square by a quarter inch compounds across every sheet in the row. By panel eight you have visible misalignment, gaps at the ribs, and a lap that will not close. Measure diagonals if the roof framing itself is suspect.
Lock it down roughly every 12 inches along the eave and at each purlin or batten, then recheck alignment before moving on.
Step 4: Secure the Side Lap
Run butyl tape along the designated high rib of the installed panel and press it firmly across the full length.
Set the next panel over it, overlapping one to two full corrugations depending on your pitch.
Fasten through both panels into framing or purlins so the screws compress the tape into a continuous line.
Screws go through the high ridges, not the valleys, unless your panel manufacturer specifies otherwise. Valleys carry water. Ribs stay dry.
Step 5: Splice End Laps and Close the Ridge
Apply sealant across the full width of the lower panel, overlap 6 to 12 inches on a purlin, and fasten through both sheets at the splice.
At the peak, lap the ridge cap over the panels on both sides with closure strips filling the corrugation profile. If your ridge detail includes ventilation, our metal roof installation team can walk the detail with you before you cut.
Fastener Placement and Lap Integrity
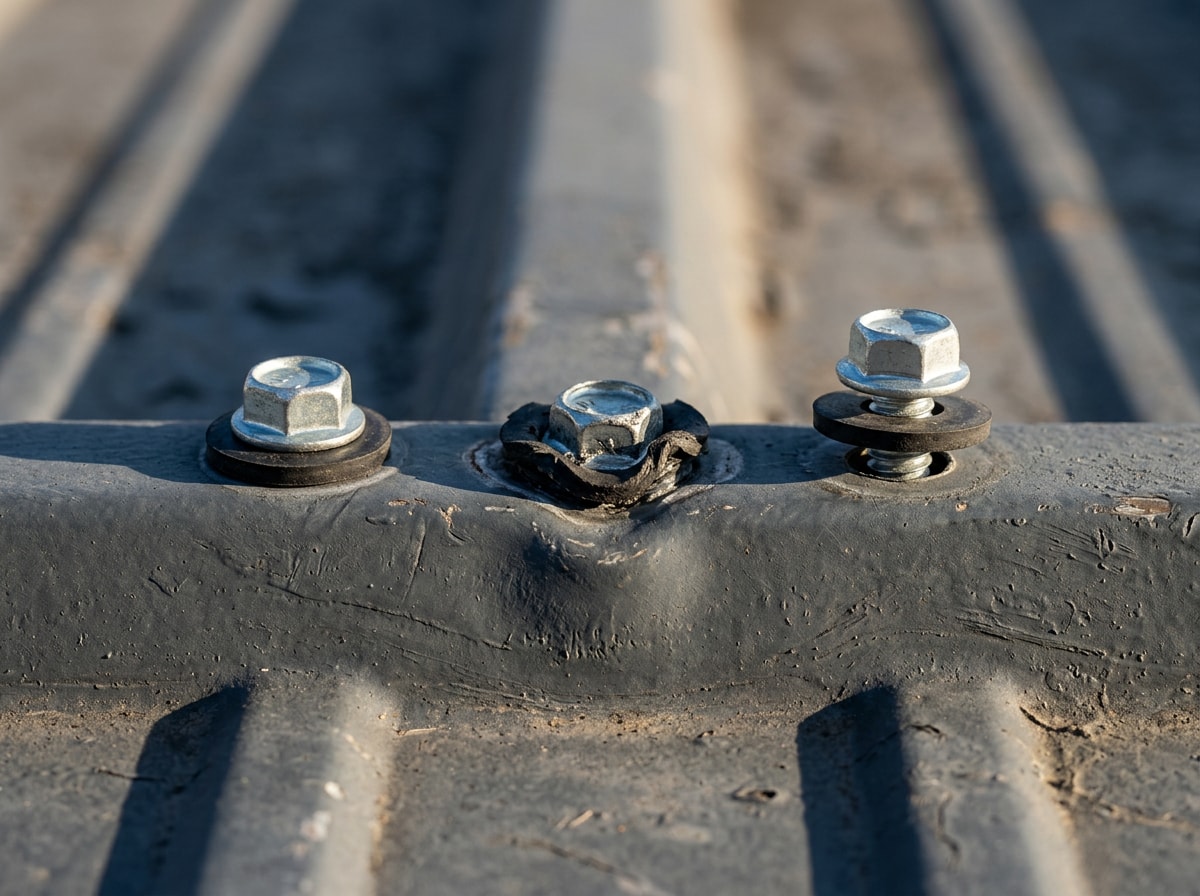
Use self-tapping screws with bonded neoprene or EPDM washers, galvanized or coated to match the panel finish. Mismatched metals corrode at the contact point. Plain nails have no business on a metal roof: panels expand and contract with temperature, and smooth shanks back out within a few seasons, leaving an open hole right at the seam.
Typical spacing:
- 12 to 24 inches in the field at each purlin
- 12 to 18 inches along side-lap seams
- Tighter at end laps, where both panels and the sealant need even compression
- Tighter still in high wind-uplift zones
Driving torque is where DIY installs most often go wrong. The washer should compress until it sits flat and slightly proud of the screw head. No squeeze-out, no dimple in the panel. Over-tightening deforms the metal into a shallow dish that ponds water and splits the washer, turning every fastener into its own leak. Under-driving leaves the washer uncompressed and the lap loose. A screw gun with an adjustable depth stop solves both.
For a deeper reference on sealants, fasteners, and panel handling, the Metal Construction Association's Metal Roof Installation Manual is the industry baseline; it was developed to improve metal roofing installation quality and is written for installers of metal roofs and related accessories .
Common Overlap Mistakes
Most leaks on exposed-fastener panels trace back to a short list:
- Lapping less than one full corrugation. Capillary wicking pulls water sideways. The stain usually appears inside along a vertical line matching the seam.
- Laps facing into the prevailing wind. The roof stays dry in ordinary rain and leaks only in storms, which makes diagnosis miserable.
- Skipping sealant on low slope. Standing water finds the seam. Sealant is not optional below 3:12.
- Fastening in the valleys. Every screw sits in the drainage channel. Expect rust rings and drips directly below each one.
- Over-tightening. Dimpled panels pond water. The stain shows as isolated spots, not a line.
- Misaligning panel one. Errors compound into gapped laps near the end of the run.
- Aligning every end lap in one row. Creates a single horizontal failure line and invites uplift.
Improper overlap also voids warranties. Most panel makers tie coverage to their published lap, sealant, and fastener specs.
When to Stop and Call Someone
Overlapping corrugated panels is one of the more DIY-friendly roofing tasks on a simple gable. It stops being that on a low slope, a cut-up roof with valleys and dormers, or anything tall.
Safety is the real line. OSHA requires workers on a steep roof with unprotected sides and edges 6 feet or more above a lower level to be protected by guardrail systems with toeboards, safety net systems, or personal fall arrest systems , per the OSHA 1926.501 fall protection standard. Homeowners rarely have that gear on hand.
If your roof is already staining, our roof leak repair crew can trace the source before you tear anything off, and a roof inspection is worth it on any low-slope or high-wind roof before you climb up.
This guide reflects how the crews at Shark Construction LLC detail exposed-fastener panels on homes across Fredericksburg, VA and the surrounding counties, including the two-corrugation call we make by default on anything under 3:12.
Planning a metal roof or chasing a seam leak? Get a free estimate and we will spec the laps for your actual pitch and exposure.
FAQ
How much should corrugated metal roofing overlap?
One full corrugation on the side and 6 to 12 inches on the end. Use the higher end-lap figure on low slopes and in high-wind areas, and two corrugations on the side below 3:12. Your panel manufacturer's spec sheet is the binding number.
How many corrugations should overlap?
One on standard residential profiles. Two when the pitch is below 3:12, the site is coastal, or the roof sees steady wind. Each extra corrugation costs you roughly 2.5 inches of coverage per sheet, so decide before you order.
Which way do you overlap corrugated roofing sheets?
Away from the prevailing wind, working eave to ridge so the upslope panel always covers the downslope panel. Check a wind rose for the nearest station, or note which side of the house takes driving rain in a storm.
Do you screw a metal roof on the ridge or flat?
Through the high ridges, so fasteners sit above the water path. At a side lap, the screw passes through both the upper and lower panel at once, which is what compresses the butyl into a continuous seal. A screw through only one panel leaves the seam loose.
What is the minimum pitch for corrugated metal roofing?
3:12 for lapped, nonsoldered seams without applied lap sealant, and 1/2:12 when lap sealant is applied per the manufacturer's instructions . Confirm the code edition your jurisdiction enforces, since local amendments can be stricter.
Do you need sealant between overlapping metal roof panels?
Below 3:12, yes, always. Above it, sealant is strongly recommended and often required for warranty coverage. Use butyl tape sealant rated for metal roofing, run continuously, and let the fasteners compress it rather than relying on the tape alone.
How far should corrugated roofing overhang at the eave?
About 1 to 2 inches past the drip edge, enough that runoff drops into the gutter instead of wrapping back onto the fascia. Confirm against your gutter position before you set the first panel.
Can you overlap metal roofing in cold weather?
Yes. Metal panels do not need ambient warmth to activate an adhesive strip the way asphalt shingles do, so winter installs are workable. Butyl stiffens in the cold and needs firmer, more deliberate pressure to bond. The real risk is handling large panels on icy decking in wind, so contact our roofing team if conditions look marginal.